How To build a Raspberry Pi powered Twitter Display

Use a Raspberry Pi to develop a stand alone Twitter appliance that can be used to display tweets in a public environment.
hashtag #5thLetchworth

Background

Every two years, Letchworth and Baldock District Scouts holds its Arts and Crafts competition. This year, it was decided to hold it in a pop-up shop in Letchworth town centre. The theme was Adventure.

The Scouts in my troop, 5th Letchworth, decided it would be a good idea to have a multi-media display; comprising a physical hashtag and a display of tweets containing that hashtag. The hashtag was, of course, #5thLetchworth.

The Scouts constructed the physical hashtag and decorated it with pictures, poems and other items that conveyed the notion of adventure. It was my task to create the twitter display.

System design

The obvious base for the display was a Raspberry Pi! of which I have several. This would be connected to a large screen TV via the built in HDMI interface, and to the Internet via my own Mi-Fi.

The Pi already has XWindows installed, so that would be used to run the Chromium browser. Chromium would be set to display a feed from www.twitterfall.com.

Setting up

Configuring the Pi

As the basis of the system, I chose to stick to the stock Raspbian distribution as it has almost everything I needed. The only changes I needed to make were to set it to startup in headless mode and allow remote VNC connections (because there wouldn’t be a keyboard or mouse connected when the system was in use). I also had to set it to auto-start Chromium.

Setting the Pi to startup in headless mode

To do this, you need to install the x11vnc package.

  1. Logon as the default user pi
  2. Open a terminal session and download the x11vnc package:

    sudo apt-get update
    sudo apt-get install x11vnc

  3. Set a password for when you attach via your VNC client.
    x11vnc -storepasswd

  4. Create a startup configuration for x11vnc. From your home directory:

    cd .config
    mkdir autostart
    cd autostart

  5. Now use your favourite editor to create the file x11vnc.desktop with the following contents:

    [Desktop Entry]
    Type=Application
    Name=X11VNC
    Exec=x11vnc -forever -shared -usepw -display :0 -ultrafilexfer
    StartupNotify=false
    Terminal=False
    Hidden=False

  6. Now reboot the Pi
  7. After it has rebooted, you should be able to use your favourite VNC client to connect to the IP address of the Pi on port 5900 using the password set it step 3.

Installing and autostarting Chromium

  1. Open another terminal session and install chromium.
    sudo install chromium
    cd .config/autostart
  2. Create the file chromium.desktop with the following contents:
    [Desktop Entry]
    Type=Application
    Name=chromium
    Exec=chromium
    StartupNotify=false
    Terminal=False
    Hidden=False
  3. If you now reboot again, the chromium browser should open automatically

Setting Chromium to open www.twitterfall.com automatically

For this to work, you need to authenticate to a twitter account and decide in advance what you wish to display. In my case I wanted to display the output from a specific Twitter List.

Complete the following in the chromium browser:

  1. Open the URL www.twitterfall.com
  2. Authenticate to the Twitter account.
  3. Set Twitterfall to display the appropriate content
  4. Copy the full URL from the chromium address bar; including the /?oauth suffix
  5. Now open a terminal session and edit the file ~/.config/autostart/chromium.desktop and change the Exec= line to be
    Exec=chromium twitterfall.com/?oauth_token=whatever
  6. Save and close and then reboot to test.

Starting Chromium in kiosk mode

The last step is to set Chromium to start in Full Screen mode

  1. Edit ~/.config/autostart/chromium.desktop again and change the Exec= line again to be:
    Exec=chromium -kiosk twitterfall.com/?oauth_token=whatever
  2. Reboot again and it should all work.

One last thing

You will have noticed that Twitterfall cannot be configured to launch in Presentation Mode. This is why you need the remote VNC connection.

I was going to have my MacBook Air with me when I installed this so I simply connected remotely and clicked on the Presentation Mode button in Twitterfall. If anybody knows how to avoid needing to do this, I’d love to hear from them.

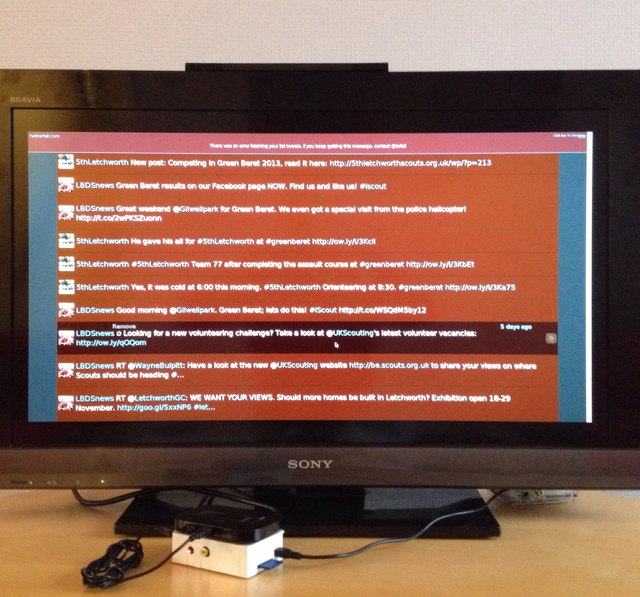
The finished article

Display of tweets from #5thLetchworth

Connecting to the Mi-Fi

The topic of How To connect a Raspberry Pi to a 3G network is covered elsewhere.

Thumbs up for Microsoft Support

Microsoft Support persists to get through and close the call

Office 365 Logo

As readers of my Business Continuity UK blog will know, I place a premium on the quality of service I receive from those who supply me with products and services in my business life. My business depends on me having reliable access to high quality products backed up by outstanding service. I hope all companies do the same.

That’s why I use Apple products for my personal productivity tools: laptop, tablet and phone. It was also one of the factors that persuaded me to move from using Google Apps for Business to Microsoft Office 365. Google, in my opinion, is becoming too insular in its device support. Unless you are running an Android powered device, you are rapidly becoming a second class denizen of GoogleWorld.

Admittedly, Microsoft used to be the same as far as Mac support was concerned, but no longer.

Anyway, I’m very happy with the functionality I get from Office 365, and I’m also in the process of moving my personal email account to Outlook.com. A recent experience with Microsoft Support has confirmed the wisdom of my choice.

Whilst support for the Mac is pretty good on Office 365, I did have a reason to raise a Support Ticket via their online portal. It was a minor matter relating to billing, but I found that I couldn’t complete the Service Request. For some reason, each time I selected an option in the drop down menus, the screen refreshed and I had to start again. After trying a couple of times, I gave up and called them instead. Note: I called them: you can’t do that with Google as far as I know; at least not at my subscription level.

Now the first point is that I received outstanding service when I called in with my billing concern. However, whilst I was on the call, I mentioned that I had experienced a problem completing an online service request. The attendant offered to report it for me, so I said yes.

Very soon after, I was contacted by email with details of the new request, asking for more details.
The next day, I received a missed call on my phone and another email to apologise for not getting through but proposing another time to call me.

Mainly down to inefficiency on my part, I missed several attempts to call me. The point is that Microsoft Support didn’t give up. Each time I missed the call, I received another email with a proposed new time. Eventually, we did speak and progressed the issue.

It’s this dedication to getting the problem resolved and closing the call that impressed me. Other organisations would have given up after the first or second failed call, but not Microsoft. That matters to me and it reinforces my decision to move to Office 365.

Oh, and if you’re reading this, Mark, thank you for your perseverance.

How To connect a Raspberry Pi to a 3G network

Connect a Raspberry Pi to a Huawei 3G Modem to allow Internet access

Motivation

As part of the project to create a stand-alone Twitter Appliance, I needed to connect a Raspberry Pi to a 3G network.

System Design

The design is simple: An existing 3G modem is connected to the Raspberry via a USB connection. I already own a Huawei E5756s mobile broadband modem connected to Three UK, and as this also has a USB connection, it was the obvious one to use for this.

Installing the modem

Installing the modem required that the Raspberry Pi recognise the modem as such. Unfortunately, out of the box, the E5756 is detected as a hard disk by Raspbian. This is because the modem has a hidden disk partition that contains the Windows driver.

  1. Plug the modem into one of the USB ports.
  2. In a terminal session, run the command

    # lsusb

With a bit of luck, you’ll see something like:

Bus 001 Device 002: ID 0424:9512 Standard Microsystems Corp.
Bus 001 Device 001: ID 1d6b:0002 Linux Foundation 2.0 root hub
Bus 001 Device 003: ID 0424:ec00 Standard Microsystems Corp.
Bus 001 Device 005: ID 12d1:1506 Huawei Technologies Co., Ltd. E398 LTE/UMTS/GSM Modem/Networkcard

The key line is the last, showing that Raspbian has recognised the modem. Unfortunately, you may well see:

Bus 001 Device 002: ID 0424:9512 Standard Microsystems Corp.
Bus 001 Device 001: ID 1d6b:0002 Linux Foundation 2.0 root hub
Bus 001 Device 003: ID 0424:ec00 Standard Microsystems Corp.
Bus 001 Device 004: ID 12d1:14fe Huawei Technologies Co., Ltd.  

This indicates that Raspbian sees the Huawei device as a disk drive. To get around this, we need to installthe usb-modeswitch package, but we need to do things in a specific order for this to work (or at least I did anyway).

Open a terminal prompt and, with the modem unplugged:

  1. install the usb-modeswitch package

    # sudo apt-get install usb-modeswitch

  2. After this completes, reboot the Pi and then log in again and open a terminal session.

  3. Plug the modem in, leave it for a second or two for it to be recognised and then do

    # lsusb

  4. Hopefully, the output will now indicate the the modem has been recognised. Display the network interface list:

    # ifconfig -a

Hopefully, you will see:

eth0      Link encap:Ethernet  HWaddr b8:27:eb:04:64:df 
          inet addr:172.29.12.204  Bcast:172.29.12.255  Mask:255.255.255.0
          UP BROADCAST RUNNING MULTICAST  MTU:1500  Metric:1
          RX packets:1191 errors:0 dropped:0 overruns:0 frame:0
          TX packets:633 errors:0 dropped:0 overruns:0 carrier:0
          collisions:0 txqueuelen:1000
          RX bytes:383489 (374.5 KiB)  TX bytes:100065 (97.7 KiB)

lo        Link encap:Local Loopback 
          inet addr:127.0.0.1  Mask:255.0.0.0
          UP LOOPBACK RUNNING  MTU:16436  Metric:1
          RX packets:0 errors:0 dropped:0 overruns:0 frame:0
          TX packets:0 errors:0 dropped:0 overruns:0 carrier:0
          collisions:0 txqueuelen:0
          RX bytes:0 (0.0 B)  TX bytes:0 (0.0 B)

wwan0     Link encap:Ethernet  HWaddr 0c:5b:8f:27:9a:64 
          UP BROADCAST RUNNING MULTICAST  MTU:1500  Metric:1
          RX packets:11 errors:0 dropped:0 overruns:0 frame:0
          TX packets:0 errors:0 dropped:0 overruns:0 carrier:0
          collisions:0 txqueuelen:1000
          RX bytes:5237 (5.1 KiB)  TX bytes:0 (0.0 B)

Good news, we have a new interface. To get this to acquire an IP address, we need to edit the file /etc/network/interfaces and add the lines:

allow-hotplug wwan0  
iface wwan0 inet dhcp

If you now reboot, you should see that the new interface has been initialised and configured:

eth0      Link encap:Ethernet  HWaddr b8:27:eb:04:64:df 
          inet addr:172.29.12.204  Bcast:172.29.12.255  Mask:255.255.255.0
          UP BROADCAST RUNNING MULTICAST  MTU:1500  Metric:1
          RX packets:1191 errors:0 dropped:0 overruns:0 frame:0
          TX packets:633 errors:0 dropped:0 overruns:0 carrier:0
          collisions:0 txqueuelen:1000
          RX bytes:383489 (374.5 KiB)  TX bytes:100065 (97.7 KiB)

lo        Link encap:Local Loopback 
          inet addr:127.0.0.1  Mask:255.0.0.0
          UP LOOPBACK RUNNING  MTU:16436  Metric:1
          RX packets:0 errors:0 dropped:0 overruns:0 frame:0
          TX packets:0 errors:0 dropped:0 overruns:0 carrier:0
          collisions:0 txqueuelen:0
          RX bytes:0 (0.0 B)  TX bytes:0 (0.0 B)

wwan0     Link encap:Ethernet  HWaddr 0c:5b:8f:27:9a:64 
              inet addr:192.168.1.101  Mask:255.255.255.0
          UP BROADCAST RUNNING MULTICAST  MTU:1500  Metric:1
          RX packets:11 errors:0 dropped:0 overruns:0 frame:0
          TX packets:0 errors:0 dropped:0 overruns:0 carrier:0
          collisions:0 txqueuelen:1000
          RX bytes:5237 (5.1 KiB)  TX bytes:0 (0.0 B)

Hoorah, the modem is connected and working.

After this bit of jiggery-pockery, the modem should continue to be recognised if it is connected at boot time.