Repairing a damp caravan – Day One


Day1Pic1

Do you need to repair a damp caravan like we do? If so, read along with us to find out we are going about fixing the problem.

First some history

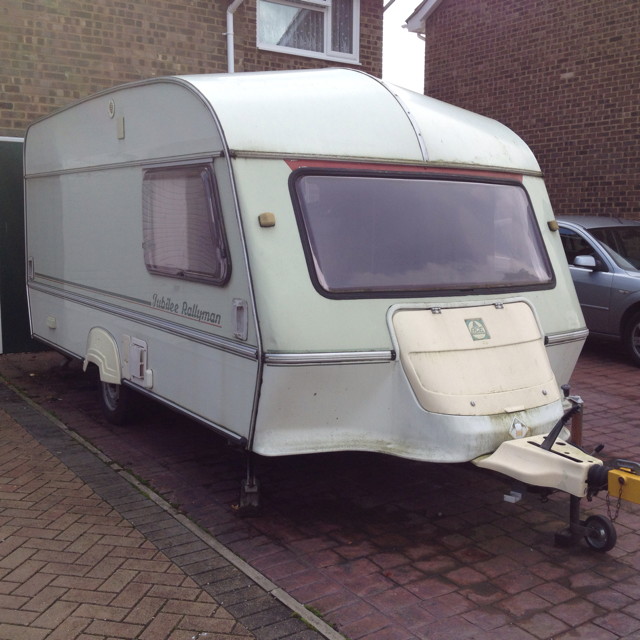
In “Fixing ABI Jubilee Rallyman taps” I introduced the need to perform some radical restoration surgery on our 1987’ish ABI Jubilee Rallyman.

When we bought the van, we knew there had been a damp problem because the seller told us so. It was also obvious, as the picture below shows.

Day1Pic2

However, the van was dry and there were no obvious signs of bodged repair jobs so we assumed it was a one-off and bought it.

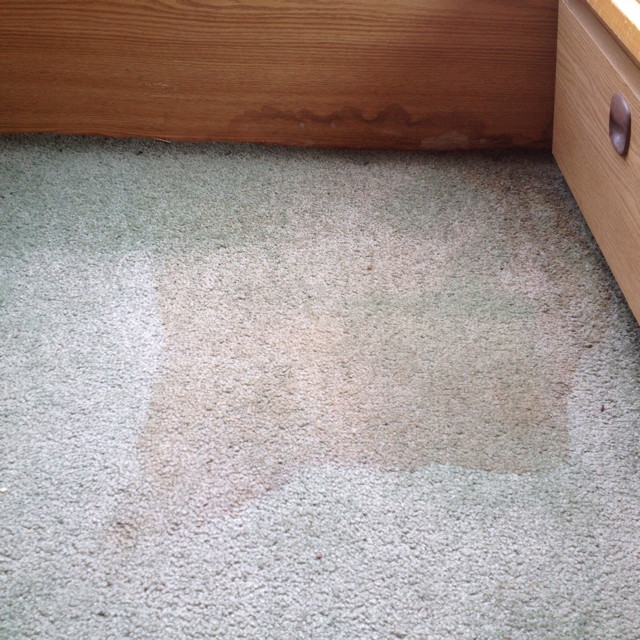
At the start of this season however, we noticed there was condensation inside the van. This was strange as there was plenty of air circulation during the winter. Inspection revealed a serious damp problem in the floor inside the front right locker, as shown below.

Day1Pic3
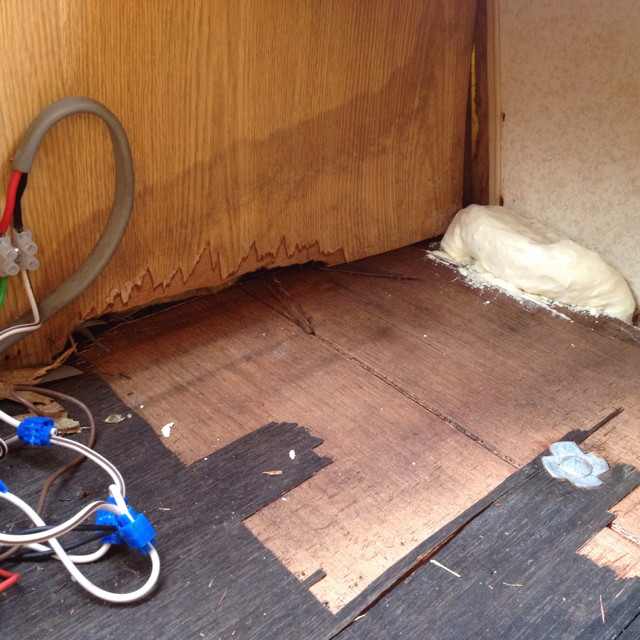
After removing the vinyl floor covering, which also removed the top layer of the underlying plywood floor (!) I dug out quite a bit of sodden flooring before finding sound, dry wood. I then dried the van out with a fan heater and put the temporary foam plug in the hole that you can see in the ‘photo.

A couple of weeks ago we stripped the wall covering from inside the top right over-locker to reveal…

Day1Pic4Yuk! You can’t really see it in the ‘photo, but the surface ripples! A damp meter confirmed the problem: damp, a lot of damp.

After finding that the damp extended to the whole right hand wall forward of the wardrobe, we knew we had a choice: repair or ditch. The ‘van only cost £650, and would only be worth peanuts if we sold it. We decided to repair it to the best of our abilities. We’re both pretty handy and I reckon we can fix just about anything. Today was day one.

Research, research, research!

My abiding principle in business is that you shouldn’t re-invent wheels: the chances are that somebody has been there before. Thus, whenever I have a problem I start researching on the Internet.

Google is your friend

Pretty quickly, I found ukcampsite.co.uk and it’s Fixed It Club Members Directory. In there I found a site where somebody was repairing a damp problem with an ABI ACE Pioneer. The ACE Pioneer is of similar vintage to the Jubilee Rallyman and was built using very similar techniques. This site was a goldmine.

Anyway

Prior to starting, I had to spend yesterday making space in the garage to take all the bits that are being removed from the ‘van. I also purchased a cheap cover for the van:

  1. to keep it from any further damage; and
  2. to keep it sealed when I remove the windows.

Repairing a damp caravan, day one

I started by removing all the soft furnishings and loose fittings and then removed the curtain rails, coving and cupboard doors. The fact that many of the screws just pulled out is an indication of the extent of the problem.

We now hit snag number one

The top right over locker needs to come out. But how? I have removed the brackets that hold it to the wall, the screws that hold it to the wardrobe and the screws that attach it to the front shelf, but it won’t move. Prodding with a fine knife reveals that it is either screwed or nailed to the ceiling. Unfortunately, I can’t find the heads. It appears to have been put in place before the outer skin was attached. Really?

I’ve started to lever it down a bit to create a space to get a single-ended hacksaw in and saw through the screw/nail, but I am concerned about side effects.

I’ve asked a question in UKCampsite.co.uk and will wait to see if anybody has a suggested way forward. In the meantime, I’ve put a fan heater in there to start the drying out process.


Fixing ABI Jubilee Rallyman taps

We have an old 1988 ABI Jubilee Rallyman caravan that we bought about three years ago for the princely sum of £650. We were looking for a small and cheap ‘van that would get us back into Caravanning, this one came up in the local press and we took a look. It had just the one previous owner and came fully equipped; including a nearly new full awning. We could see that there had been a small damp problem but nothing showed up on the damp meter so we bought it.

Three years later and after quite a lot of use, we now accept that it actually has quite a large damp problem. It only really became apparent this spring when we noticed that the offside wall was starting to bow inwards slightly. Testing with a damp meter confirmed that the offside wall is very damp at the front and rear.

We did a lot of research and soul searching about how to approach this. Should we just ditch the ‘van, get it fixed professionally, or fix it ourselves. After finding the excellent ukcampsite.co.uk and the even more relevant Fixed It club we decided on the latter course of action.

Partly as a way of recording progress, but also hopefully as a help to others, I intend to blog about this.

This first blog is not about fixing the damp problem however: it’s actually about fixing the taps.

This caravan adopts the fairly common approach of using a Whale submersible pump to feed water to a number of taps; each of which is fitted with a micro switch that controls the pump. In theory, opening any tap closes a micro switch which then causes the pump to operate. I say in theory because this has become very flaky over the recent period. In fact it had got to the stage where only one tap was working properly. It was time for action!

Taking advantage of some free time, I decided to investigate the taps on the kitchen sink. I couldn’t see any markings and searching the internet failed to reveal who the manufacturer was, so I resorted to direct inspection.

After taking out the sink to gain better access, I decided the only course of action was to remove the knobs in the hope that the micro switch was hidden underneath. Given that the taps were not working anyway, I decided to prise the caps off. Luckily one came off fairly easily and revealed that the micro switch is an open unit with exposed contacts. All the ones I had found on the internet used sealed switch units which were replaceable: not with this old gal. However, the open nature of the switches meant that I could clean the contacts. I did so by slipping a piece of heavy printer paper between the contacts, manually closing the contacts and then pulling the paper out. The roughness of the paper was sufficient to wipe off the crud that had become deposited on the contact surfaces. A volt meter confirmed that the switch was now working, so I replaced the caps. Bingo, the water began the flow.

The following photos show the similar taps in the shower room.

Shower Room Taps
Shower Room Taps

I prised the top off with an wedge placed under the tap knob, to show:
The mechanism

As you can see, from this and the next photo, there is a nut that locates in the cap and which controls the position of a plunger type valve.
tap with valve removed

Pulling out the plunger, and being careful not to change the location of the nut on the thread, gives access to the micro switch. Gently prising the switch out the housing using a fine screwdriver gave me full access to the switch contacts.
Tap micro switch

I cleaned the contacts and then reversed the procedure to re-assemble the tap.

Unfortunately, during my investigative work, I had disturbed the piping and there was now a persistent leak from the tap.

Anybody who has worked on a caravan will know that they were put together with zero thought for later maintenance. To do anything tends to requires one to reverse the assembly procedure. Luckily, these taps had press fit spigots on the ends of the pipes that inserted into the base of the tap and were sealed with rubber ‘O’ rings. Fixing the leak was a simple matter of re-sealing the ‘O’ ring, smearing a bit of Vaseline on the spigot and ring and then pushing the spigot back into the tap until it clicked.

Job done.

However, this is only the start. I’ve also noticed that cracks are appearing in the handles that operate the roof vents and a couple of drawer handles are beginning to fail. There’s a lot to be done.

Update

It appears that the kitchen taps are from the Reich range. I assume the shower room taps are also, but they seem to have been discontinued.