Upgrading the disk space in my ZFS-based servers – pt 4

Part 1, Part 2, Part 3

Back on Deneb

I followed a similar procedure with the pools on deneb. The only change was that instead of running the second snapshot plus send/recv task with the system running normally, I ran it with the system running in no install/recovery mode. That way no services or zones were running.

After I had completed renaming, exporting and importing the pools, I rebooted as I had done with eridani. I immediately hit a problem: Smartos crashed at some point during the boot process. Unfortunately, the crash message scrolled off the screen before I could see what it was.

I rebooted and videoed the boot sequence on my ‘phone. There’s a kernel panic that causes the crash but it’s impossible to determine what the cause is.

On the basis that I can only really make progress with a running system, I decided to

  • reboot into recovery mode
  • destroy the the new pool
  • import the old pool as zzbackup
  • install SmartOS on to t a newly created pool
  • try and debug from there.

I removed dsk3 (containing the zzbackup pool) and then reinstalled smartos on to a newly created raidz1 pool.

When I rebooted without dsk3 the system was stable. When I then rebooted with dsk3 installed, the system panicked again!

I rebooted into recovery mode, imported zzbackup and destroyed it.

Now it reboots OK. Now I can import the destroyed zzbackup pool on to an alternate mount point.

[root@deneb ~]# zpool status
  pool: zones
 state: ONLINE
  scan: none requested
config:

        NAME        STATE     READ WRITE CKSUM
        zones       ONLINE       0     0     0
          raidz1-0  ONLINE       0     0     0
            c1t0d0  ONLINE       0     0     0
            c1t1d0  ONLINE       0     0     0
            c1t2d0  ONLINE       0     0     0
        logs
          c1t4d0    ONLINE       0     0     0

errors: No known data errors
[root@deneb ~]# zpool import -D
   pool: zzbackup
     id: 11000531473529046782
  state: ONLINE (DESTROYED)
 action: The pool can be imported using its name or numeric identifier.
 config:

        zzbackup    ONLINE
          c1t3d0    ONLINE
[root@deneb ~]# mkdir /alt
[root@deneb ~]# zpool import -D -R /alt zzbackup
[root@deneb ~]# zpool status
  pool: zones
 state: ONLINE
  scan: none requested
config:

        NAME        STATE     READ WRITE CKSUM
        zones       ONLINE       0     0     0
          raidz1-0  ONLINE       0     0     0
            c1t0d0  ONLINE       0     0     0
            c1t1d0  ONLINE       0     0     0
            c1t2d0  ONLINE       0     0     0
        logs
          c1t4d0    ONLINE       0     0     0

errors: No known data errors

  pool: zzbackup
 state: ONLINE
  scan: scrub repaired 0 in 4h47m with 0 errors on Tue Feb  6 22:32:20 2018
config:

        NAME        STATE     READ WRITE CKSUM
        zzbackup    ONLINE       0     0     0
          c1t3d0    ONLINE       0     0     0

errors: No known data errors
[root@deneb ~]# zfs mount
zones                           /zones
zones/archive                   /zones/archive
zones/cores/global              /zones/global/cores
zones/var                       /var
zones/config                    /etc/zones
zones/opt                       /opt
zones/usbkey                    /usbkey
zzbackup/opt/data               /alt/data
zzbackup/opt/data/backups       /alt/data/backups
zzbackup/opt/data/cfg-backups   /alt/data/cfg-backups
zzbackup/opt/data/dev_backups   /alt/data/dev_backups
zzbackup/opt/data/home          /alt/data/home
zzbackup/opt/data/home/git      /alt/data/home/git
zzbackup/opt/data/media         /alt/data/media
zzbackup/opt/data/public        /alt/data/public
zzbackup/opt/data/software      /alt/data/software
...
zzbackup/archive                /alt/zones/archive
...
zzbackup/cores/global           /alt/zones/global/cores
zzbackup                        /alt/zzbackup

Now I can rebuild deneb from the old system. A bit tedious though.

  1. Copied usbkey over and rebooted (had to destroy zzbackup first again though)
  2. Copied /opt over so that the custom services start up.
  3. Rebooted to be sure.

Before laboriously rebuilding, I decided to try booting with dsk3 as zones and the new pool as zznew.

It boots, but the mountpoints are screwed!

root@deneb ~ $ zfs list
NAME                                               USED  AVAIL  REFER  MOUNTPOINT
zones                                             2.67T   863G   588K  /zones
zones/0246b0fe-771c-60ba-cbe6-92ea5795117b        1.21G  8.79G  1.27G  /zones/0246b0fe-771c-60ba-cbe6-92ea5795117b
zones/088b97b0-e1a1-11e5-b895-9baa2086eb33         528M   863G   527M  /zones/088b97b0-e1a1-11e5-b895-9baa2086eb33
zones/147f4eca-1783-4b80-d7e4-9a1d4420567a         294M  9.71G   432M  /zones/147f4eca-1783-4b80-d7e4-9a1d4420567a
zones/163cd9fe-0c90-11e6-bd05-afd50e5961b6         257M   863G   257M  /zones/163cd9fe-0c90-11e6-bd05-afd50e5961b6
zones/1870884c-780a-cb0b-fdc0-8e740afa4173         320M  9.69G   459M  /zones/1870884c-780a-cb0b-fdc0-8e740afa4173
zones/1bd84670-055a-11e5-aaa2-0346bb21d5a1        52.2M   863G  51.9M  /zones/1bd84670-055a-11e5-aaa2-0346bb21d5a1
zones/1ed69a26-f60b-401c-bde6-793df2d0547b        2.12G   498G  2.01G  /zones/1ed69a26-f60b-401c-bde6-793df2d0547b
zones/2a9bfaf4-ddf1-e146-ab80-e2f8723ec714         313M  9.69G   453M  /zones/2a9bfaf4-ddf1-e146-ab80-e2f8723ec714
zones/46c77656-5d22-cdaf-8056-88aaa11c1e58         790M  9.23G   868M  /zones/46c77656-5d22-cdaf-8056-88aaa11c1e58
zones/4bc5b510-2d5d-e47e-c3bc-d492dfeae320         813M  9.21G   813M  /zones/4bc5b510-2d5d-e47e-c3bc-d492dfeae320
zones/4bc5b510-2d5d-e47e-c3bc-d492dfeae320-disk0  53.9G   903G  11.1G  -
zones/5c7d0d24-3475-11e5-8e67-27953a8b237e         256M   863G   256M  /zones/5c7d0d24-3475-11e5-8e67-27953a8b237e
zones/7b5981c4-1889-11e7-b4c5-3f3bdfc9b88b         241M   863G   240M  /zones/7b5981c4-1889-11e7-b4c5-3f3bdfc9b88b
zones/842e6fa6-6e9b-11e5-8402-1b490459e334         226M   863G   226M  /zones/842e6fa6-6e9b-11e5-8402-1b490459e334
zones/a21a64a0-0809-11e5-a64f-ff80e8e8086f         186M   863G   186M  /zones/a21a64a0-0809-11e5-a64f-ff80e8e8086f
zones/archive                                      152K   863G    88K  none
zones/b33d4dec-db27-4337-93b5-1f5e7c5b47ce         792M   863G   792M  -
zones/c8d68a9e-4682-11e5-9450-4f4fadd0936d         139M   863G   139M  /zones/c8d68a9e-4682-11e5-9450-4f4fadd0936d
zones/config                                       468K   863G   196K  legacy
zones/cores                                        250M   863G    88K  none
...
zones/cores/global                                 152K  10.0G    88K  /zones/global/cores
...
zones/dump                                         260K   863G   140K  -
...
zones/opt                                         2.50T   863G  1.20G  legacy
zones/opt/data                                    2.49T   863G   112K  /data
zones/opt/data/backups                             617G   863G   466G  /data/backups
zones/opt/data/cfg-backups                        57.2G   863G  47.8G  /data/cfg-backups
zones/opt/data/dev_backups                        2.61G   863G  2.61G  /data/dev_backups
zones/opt/data/home                                108G   863G   108G  /data/home
zones/opt/data/home/git                            152K   863G    88K  /data/home/git
zones/opt/data/media                              1.73T   863G  1.73T  /data/media
zones/opt/data/public                              172K   863G   108K  /data/public
zones/opt/data/software                            336K   863G   272K  /data/software
zones/swap                                        33.2G   896G   246M  -
zones/usbkey                                       196K   863G   132K  legacy
zones/var                                         1.05G   863G  1.03G  legacy
zznew                                             37.6G  3.47T  1018K  /zznew
zznew/archive                                      117K  3.47T   117K  /zznew/archive
zznew/config                                       139K  3.47T   139K  legacy
zznew/cores                                        234K  3.47T   117K  none
zznew/cores/global                                 117K  10.0G   117K  /zznew/global/cores
zznew/dump                                        1.84G  3.47T  1.84G  -
zznew/opt                                         2.88G  3.47T  2.88G  legacy
zznew/swap                                        32.9G  3.50T  74.6K  -
zznew/usbkey                                       261K  3.47T   261K  legacy
zznew/var                                         3.91M  3.47T  3.91M  /zznew/var

This may be the cause of the panic
The salient parts are:

root@deneb ~ $ zfs list
NAME                                               USED  AVAIL  REFER  MOUNTPOINT
zones                                             2.67T   863G   588K  /zones
zones/archive                                      152K   863G    88K  none
…
zones/config                                       468K   863G   196K  legacy
zones/cores                                        250M   863G    88K  none
…
zones/cores/global                                 152K  10.0G    88K  /zones/global/cores
…
zones/dump                                         260K   863G   140K  -
…
zones/opt                                         2.50T   863G  1.20G  legacy
…
zones/swap                                        33.2G   896G   246M  -
zones/usbkey                                       196K   863G   132K  legacy
zones/var                                         1.05G   863G  1.03G  legacy
zznew                                             37.6G  3.47T  1018K  /zznew
zznew/archive                                      117K  3.47T   117K  /zznew/archive
zznew/config                                       139K  3.47T   139K  legacy
zznew/cores                                        234K  3.47T   117K  none
zznew/cores/global                                 117K  10.0G   117K  /zznew/global/cores
zznew/dump                                        1.84G  3.47T  1.84G  -
zznew/opt                                         2.88G  3.47T  2.88G  legacy
zznew/swap                                        32.9G  3.50T  74.6K  -
zznew/usbkey                                       261K  3.47T   261K  legacy
zznew/var                                         3.91M  3.47T  3.91M  /zznew/var

root@deneb ~ $ zfs mount
zones                           /zones
…
zznew                           /zznew
zznew/archive                   /zznew/archive
zznew/cores/global              /zznew/global/cores
zznew/var                       /zznew/var
zznew/config                    /etc/zones
zznew/opt                       /opt
zznew/usbkey                    /usbkey

As you can see, some of the legacy datasets on zznew are being mounted instead of the equivalents from zones. i.e. it seems to be mixing up the legacy mounts.

yet more to follow

Upgrading the disk space in my ZFS-based servers – pt 3

Part 1, Part 2
It was now time to try the same recipe on the main server: deneb

On Deneb

root@deneb ~ $ zpool status
pool: zones
state: ONLINE
scan: scrub repaired 0 in 7h21m with 0 errors on Fri May 19 18:22:48 2017
config:

NAME STATE READ WRITE CKSUM
zones ONLINE 0 0 0
mirror-0 ONLINE 0 0 0
c1t0d0 ONLINE 0 0 0
c1t1d0 ONLINE 0 0 0
mirror-2 ONLINE 0 0 0
c1t2d0 ONLINE 0 0 0
c1t3d0 ONLINE 0 0 0
logs
c1t4d0 ONLINE 0 0 0

errors: No known data errors

Downgrade one of the mirrors to make room for a new 4TB disk that can be used as a temporary store for deneb‘s data.

root@deneb ~ $ zpool detach zones c1t3d0
root@deneb ~ $ zpool status
pool: zones
state: ONLINE
scan: scrub repaired 0 in 7h21m with 0 errors on Fri May 19 18:22:48 2017
config:

NAME STATE READ WRITE CKSUM
zones ONLINE 0 0 0
mirror-0 ONLINE 0 0 0
c1t0d0 ONLINE 0 0 0
c1t1d0 ONLINE 0 0 0
c1t2d0 ONLINE 0 0 0
logs
c1t4d0 ONLINE 0 0 0

errors: No known data errors
root@deneb ~ $ poweroff
poweroff: Halting 9 zones.

I removed disk 4 and installed the third new 4TB disk in its place.

root@deneb ~ $ zpool status
pool: zones
state: ONLINE
scan: scrub repaired 0 in 7h21m with 0 errors on Fri May 19 18:22:48 2017
config:

NAME STATE READ WRITE CKSUM
zones ONLINE 0 0 0
mirror-0 ONLINE 0 0 0
c1t0d0 ONLINE 0 0 0
c1t1d0 ONLINE 0 0 0
c1t2d0 ONLINE 0 0 0
logs
c1t4d0 ONLINE 0 0 0

errors: No known data errors
root@deneb ~ $ zpool create newzones c1t3d0
root@deneb ~ $ zpool status
pool: newzones
state: ONLINE
scan: none requested
config:

NAME STATE READ WRITE CKSUM
newzones ONLINE 0 0 0
c1t3d0 ONLINE 0 0 0

errors: No known data errors

pool: zones
state: ONLINE
scan: scrub repaired 0 in 7h21m with 0 errors on Fri May 19 18:22:48 2017
config:

NAME STATE READ WRITE CKSUM
zones ONLINE 0 0 0
mirror-0 ONLINE 0 0 0
c1t0d0 ONLINE 0 0 0
c1t1d0 ONLINE 0 0 0
c1t2d0 ONLINE 0 0 0
logs
c1t4d0 ONLINE 0 0 0

errors: No known data errors

Now I can clone zones on to newzones

root@deneb ~ $ zfs snapshot -r zones@txfr1
root@deneb ~ $ zfs send -R zones@txfr1 | zfs recv -F newzones

This took a long time!

Upgrading the disk space in my ZFS-based servers – pt 2

See here for part 1

On Eridani

Once the initial send/recv had completed, I did another snapshot and sent the incremental data just in case anything had changed.

root@eridani ~ $ zfs snapshot -r zones@txfr2
root@eridani ~ $ zfs send -R -i txfr zones@txfr2 | pv | zfs recv tempzone

Lastly, I promoted the incremental snapshot to be the current version of tempzone

root@eridani ~ $ zfs rollback tempzone@txfr2

As a final (paranoid) check, I ran a dummy rsync task to check if /zones was the same as /tempzone

root@eridani ~ $ rsync -avn /zones/ /tempzone/ | less
sending incremental file list
global/cores/

sent 765011152 bytes  received 2764561 bytes  486087.82 bytes/sec
total size is 3454738169591  speedup is 4499.67 (DRY RUN)

Nothing had changed, so I could now swap the pools over

root@eridani ~ $ zpool export tempzone

GOTCHA!

I couldn’t export the root zones pool at this point because it had mounted filesystems that were in use by the running system. To get further I had to reboot the system into restore/recovery mode.

In this mode, no pools are imported, so I could execute the following commands

zpool status - to confirm that no pools were mounted
zpool import - to see what pools were available
zpool import -NR /t1 tempzone zones - -NR to avoid any datasets being mounted and use an alternate mount point
zpool import -NR /t2  zones oldzones
zpool export oldzones
zpool export zones
reboot

I was still getting errors even though the pools had been renamed. The problem turned out to be that when SmartOS boots, it seems to mount the pools in alphabetical order.

Probably more likely that SmartOS scans the disks in alphabetical order

Thus, oldzones was mounted before zones and it’s datasets were grabbing the mount points.
Rather than laboriously change the mountpoint property on all the datasets, I simply disconnected the disk.

Once I had completed this, eridani booted using the new pool.

root@eridani ~ $ 
root@eridani ~ $ zpool status
  pool: zones
 state: ONLINE
  scan: none requested
config:

    NAME        STATE     READ WRITE CKSUM
    zones       ONLINE       0     0     0
      raidz1-0  ONLINE       0     0     0
        c2d1    ONLINE       0     0     0
        c3d0    ONLINE       0     0     0
        c3d1    ONLINE       0     0     0

errors: No known data errors
root@eridani ~ $ zfs list
NAME                                                                  USED  AVAIL  REFER  MOUNTPOINT
zones                                                                2.52T  2.73T   318K  /zones
zones/archive                                                        29.3K  2.73T  29.3K  none
zones/backup                                                         2.50T  2.73T  29.3K  /zones/backup
zones/backup/deneb                                                   2.50T  2.73T  29.3K  /zones/backup/deneb
zones/backup/deneb/zones                                             2.50T  2.73T   324K  /zones/backup/deneb/zones
...
zones/config                                                         55.9K  2.73T  36.0K  legacy
zones/cores                                                          58.6K  2.73T  29.3K  none
zones/cores/global                                                   29.3K  10.0G  29.3K  /zones/global/cores
zones/dump                                                           1023M  2.73T  1023M  -
zones/opt                                                             423M  2.73T   422M  legacy
zones/swap                                                           17.9G  2.74T  1.44G  -
zones/usbkey                                                         38.6K  2.73T  38.6K  legacy
zones/var                                                            7.08M  2.73T  5.42M  legacy
root@eridani ~ $ zfs mount
zones                           /zones
zones/backup                    /zones/backup
zones/backup/deneb              /zones/backup/deneb
zones/backup/deneb/zones        /zones/backup/deneb/zones
...
zones/backup/deneb/zones/usbkey  /zones/backup/deneb/zones/usbkey
zones/backup/deneb/zones/var    /zones/backup/deneb/zones/var
zones/cores/global              /zones/global/cores
zones/var                       /var
zones/config                    /etc/zones
zones/opt                       /opt
zones/usbkey                    /usbkey
root@eridani ~ $ 

Upgrading the disk space in my ZFS-based servers – pt 1

Introduction

Back in 2016 I bought a Supermicro server and installed SMARTOS to create a very capable home server. I named this server Deneb. See my posts on my new ZFS home server for more details.
Some time later, I bought an old Dell T310 to act as a backup device for Deneb. I named this server Eridani and use ZnapZend2 to perform 4-hourly snapshots and nightly backups of Deneb to Eridani.
All has been working well, but I am now approaching the point where I am running out of space on Eridani and Deneb is not far off a similar position.

  • Eridani is close to full capacity (>90%)
  • Deneb is wasteful in its use of disk. It uses two dual-disk mirrors instead of raidz1
  • Deneb is also at 81% (3.62 total)

Objectives

After some consideration, I set the objectives as being to aim for 3-5 years of space on both servers, and to achieve this partly by moving to raidz1 to improve space utilisation.

Current Configurations

Deneb

  • Supermicro server, X10SDV-TLN4F motherboard, 32GB ECC RAM, single XEON
  • 4 x HGST Ultrastor 2TB 7200rpm SATA disks
  • 2 x mirrored pairs
  • 4TB in total

Eridani

  • Dell T301 server, single Xeon, 16GB ECC RAM
  • 2 x 3TB disks in mirror
  • 3TB in total

Strategy

  • Move Deneb and Eridani to raidz1
  • Increase Deneb from 4TB to 6TB (4 x 2TB disks in raidz1 = 6TB)
  • Increase Eridani to 9TB (3 x 4TB + 1 x 3TB disks in raidz1 = 9TB

At a later point, I may replace the 3TB disks to give 12TB.

In addition, I proposed to move a few zones from Deneb to Eridani. Deneb is currently used to backup a number of other computers in the house.

  • veeam is the backup target for the Windows computers in the house. They all run veeam nightly.
  • cfg-backups runs rsnapshot to backup a number of Raspberry Pi computers in the house.
  • Lastly, dev-backups contains dd images of the Raspberry Pi computers that can be loaded by NOOBS3
    Moving these to Eridani would free 700G on Deneb without increasing space usage on Eridani.

High Level Plan

Part 1 – Eridani

  1. Buy 3 new 4TB disks
  2. Split the mirror on Eridani to free one of the 3TB disks
  3. Create a new 6TB raidz1 pool with the freed 3TB disk and 2 of the new 4TB disks
  4. Migrate the existing pool to the new pool
  5. Destroy the old pool and add its 3TB to the new pool, making 9TB

Part 2 – Deneb

  1. Split one of the mirrors on Deneb and replace the detached disk with the third 4TB disk
  2. Create a new temporary pool containing just the 4TB disk
  3. Migrate the existing pool to the temporary pool
  4. Destroy the old pool and rebuild it as raidz1, giving 4TB
  5. Migrate the data back to the newly built pool
  6. Destroy the temporary pool and replace the 4TB disk with the original 2TB disk
  7. Add the 2TB disk into the raidz1 pool to make 6TB
  8. Keep the 4TB disk as a spare.

Implementation

Prepare Eridani

The first task was to downgrade the existing mirrored zpool to be a single disk so that I could re-use the second disk as part of the new raidz1 pool.

After logging in to Eridani…

  1. Check the status of the pool
root@eridani ~ $ zpool status
pool: zones
state: ONLINE
scan: scrub repaired 0 in 9h1m with 0 errors on Fri Sep 22 05:01:02 2017
config:

NAME STATE READ WRITE CKSUM
zones ONLINE 0 0 0
mirror-0 ONLINE 0 0 0
c2d0 ONLINE 0 0 0
c3d0 ONLINE 0 0 0

errors: No known data errors
  1. Detach the second HD to make room for a new 4TB disk
root@eridani ~ $ zpool detach zones c3d0
root@eridani ~ $ zpool status
pool: zones
state: ONLINE
scan: scrub repaired 0 in 9h1m with 0 errors on Fri Sep 22 05:01:02 2017
config:

NAME STATE READ WRITE CKSUM
zones ONLINE 0 0 0
c2d0 ONLINE 0 0 0

errors: No known data errors
root@eridani ~ $ poweroff

Upgrade the disks

With the power off, I installed two new 4TB HGST Deskstar NAS disks into the empty slots in the T310. These will appear as c3d1 and c4d0.

Adjust the BIOS settings to recognise the new disks

The T310 originally came with a PERC 6/i RAID controller. Unfortunately, the 6/i only supports 2TB disks or smaller, so I had to ditch it and use the SATA ports on the motherboard itself. This was not a great loss, as I wasn’t going to make use of the RAID capabilities anyway, but it did throw me a curve ball when I originally got the T310.

SMARTOS runs from an external USB drive rather than from the internal disks. This is not the default behaviour and has to be forced by adjusting the BIOS settings. Adding new disks resets the boot sequence to the default.

I accessed the T310 via the iDRAC and intercepted the boot sequence with <F2>. I then went into SATA Settings to check that the new disks had been registered. I then went into Boot Sequence and modified it to reboot from the external USB.

Reconfigure Eridani’s disks

root@eridani ~ $ zpool status
pool: zones
state: ONLINE
scan: scrub repaired 0 in 9h1m with 0 errors on Fri Sep 22 05:01:02 2017
config:

NAME STATE READ WRITE CKSUM
zones ONLINE 0 0 0
c2d0 ONLINE 0 0 0

errors: No known data errors
root@eridani ~ $ zpool create tempzone raidz1 c2d1 c3d0 c3d1
root@eridani ~ $ zpool status
pool: tempzone
state: ONLINE
scan: none requested
config:

NAME STATE READ WRITE CKSUM
tempzone ONLINE 0 0 0
raidz1-0 ONLINE 0 0 0
c2d1 ONLINE 0 0 0
c3d0 ONLINE 0 0 0
c3d1 ONLINE 0 0 0

errors: No known data errors

pool: zones
state: ONLINE
scan: scrub repaired 0 in 9h1m with 0 errors on Fri Sep 22 05:01:02 2017
config:

NAME STATE READ WRITE CKSUM
zones ONLINE 0 0 0
c2d0 ONLINE 0 0 0

errors: No known data errors
root@eridani ~ $ zfs snapshot -r zones@txfr
root@eridani ~ $ zfs send -R zones@txfr | pv | zfs recv -F tempzone

Note: I used pv so I could see progress.

To be continued

PiDashCam part four – Beta code released

Part four of the series on my development of a Raspberry Pi based dashcam. See this post for part one, this post for part two and this post for part three.

It’s been a while since I posted, but the holidays got in the way. Anyhow, progress has been made and I am now in the beta testing phase. I have working code, which can be found on github, and the python module can be found in pypi by searching for ‘pidashcam’.

The next stage is to get the breadboard dashcam into my car and see whether it works in the real world: so far it’s been sitting on my bench taking videos of pretty much nothing; and with no movement.

I also need to noodle more on how I am going to package this thing.

PiDashCam part two – Hardware, Software Overview and Pseudo Code

Part 2 of the series on my development of a Raspberry Pi based dashcam. See this post for part 1
Photo of PiDashCam breadboard

Although I’ve only just posted part 1 I’ve actually made quite a lot of progress towards achieving the objectives (as outlined in part 1.) In this post, I’ll look at the hardware I’ve chosen and show the Software Overview and Pseudo Code for pidashcam daemon

Breadboard Hardware

The picture at the top shows the basic hardware sitting on a breadboard for development.

  • Raspberry Pi 3 with the UPS Pico HAT sitting on top (including 450mAh battery)
  • Breadboard with Adafruit Ultimate GPS (including external antenna because I’m indoors) and the two buttons.
    I haven’t got the LEDs on yet.

The one addition is the HDMI Camera Extender I purchased from Tindie. This will allow me to have the camera mounted up near the top of the screen but have the main unit down on the dashboard somewhere: maybe down behind the gear change on my Golf Cabriolet.

PiDashCam Code Overview

The code comprises an installed system daemon with three threads:
1. Main thread
3. Camera thread
4. GPS thread

There are interrupt routines to handle the two buttons and there are several Events to manage signalling between the threads.

Pseudo Code

Subject to change – I’ll come back and revise this as development progresses

Button A interrupt handler (flush video)
  Wait for ExtraTime seconds
  set the flushBuffer event

Button B interrupt handler (stop recording)
  If recording
    Wait for ExtraTime seconds
    set the flushBuffer event
    wait for 
    reset the recording event
  Else
    Set the recording event
  EndIf

Camera thread
   Do until shutDown
      If recording
         Initialise Camera
         While recording
            start recording into buffer
            If flushBuffer
               flush buffer to new file
                  If shutdown is set
                     reset recording event
            Else
               update annotation with current date-time, position and speed
            EndIf
            wait for 0.2 seconds
         EndWhile
      EndIf
      wait for 1 second
   EndDo
   END

GPS Thread
    Initialise connection to gpsd
    Do until shutDown
        update current GPS info
    EndDo
    END

Power failure
  wait for ExtraTime seconds
  set flushBuffer
  set shutdown

Main thread
  Kick off Camera thread
  Kick off GPS thread
  reset the flush video flag
  reset the shutdown flag
  set the record flag
  while not shutdown
      wait for 1 second
  while LAN is connected and there are videos in the sync folder
      wait for 1 second
  Kill threads
  initiate system shutdown
  exit

PiDashCam – Raspberry Pi based dashcam – Part One

This is the first in a series of posts about developing a Raspberry Pi based dashboard camera (dashcam) for my own personal use. I’m also using the project to improve my Python coding skills and re-use a whole load of software engineering patterns I used to deploy when I was a software engineer yonks ago.

Motivation

Like many regular drivers, I see a lot of strange behaviour when I’m out on the roads and I often comment to myself that it would be interesting to have something on video. The lady who zoomed past me on the M25 busily touching up her eye makeup; the van driver who had his morning paper spread out across the steering wheel, the lunatic in the BMW who cut across three lanes on the M1 to avoid missing his exit and precipitated a multi-car shunt: the list goes on.

I have been meaning to buy a dashcam that would allow me to capture these delights on video.
However, rather than just shell out for a commercial dashcam, I decided to make one for myself and to my own specification.

Requirements

These are the requirements I used to drive the system design

  • Single forward facing camera with option for second rearward facing camera
  • Built using Raspberry Pi and programmed in Python
  • Should continue recording even if power has failed (e.g. in an accident)
  • Record HD MPEG format videos continuously but avoid running out of disk space
  • Simple UI to record a notable event and pause/resume recording
  • Video overlaid with Date, Time, Position, Speed and Direction
  • Automatic transfer of recorded video to home Mac when in range of home Wi-Fi
  • to avoid need to physically access pidashcam to extract videos
  • to save space on pidashcam

System Design

After considering the above, I came up with the following system design

Raspberry Pi Model 3 in the Car

  • Connects automatically to Home WI-Fi network
  • PiModules UPS Pico to provide the battery backup, file-safe shutdown and RTC
  • Forward facing Pi Camera
  • Option for USB connected WebCam for rear facing camera
  • Adafruit Ultimate GPS breakout board to source the positional data
  • Two momentary push buttons for external inputs
  • Two LEDs to indicate system status
  • Custom system daemon written in Python to implement the PiDashCam features
  • Resilio Sync1 to synchronise the local video filesystem with my Mac whenever I am connected to home Wi-Fi

iMac in Home

  • Resilio Sync
  • Hazel to:
  • move new videos to another folder (and thus save space on PiDashCam)
  • convert the videos from h264 format to mpeg
  • fire off a Pushover alert to tell me that there are videos to watch

PiDashCam Use Cases

External power is applied to PiDashCam – e.g. ignition switched on

  • Start to record into 5 min circular buffer with positional data overlaid on video stream
  • Switch on LED 1 to indicate that recording is in progress
  • LED 2 remains off

Button A is pressed – flush the current buffer to disk

  • Save content of circular buffer plus another 5 mins of video to disk
  • Flash LED 1 2Hz 50:50 duty cycle whilst this is going on
  • Resume recording into circular buffer

Button B is pressed – flush and pause

  • if PiDashCam is recording
  • simulate Button A being pressed but then pause recording
  • extinguish LED 1
  • otherwise
  • resume recording

UPS signals it has gone on to battery – e.g. ignition switched off

  • Simulate Button B being pressed
  • If PiDashCam is connected to home Wi-Fi
  • Wait for the Videos folder to become empty
  • Flash LED 2 2Hz 50:50 duty cycle whilst this is going on
  • (Note: if UPS PIco battery runs down, it will shutdown PiDashCam safely)
  • shutdown
  • Otherwise
  • shutdown

More to follow


  1. Resilio Sync is a private P2P networking product from the people who brought us BitTorrent. I used the free Sync Home product. 

How To build a Raspberry Pi powered Twitter Display

Use a Raspberry Pi to develop a stand alone Twitter appliance that can be used to display tweets in a public environment.
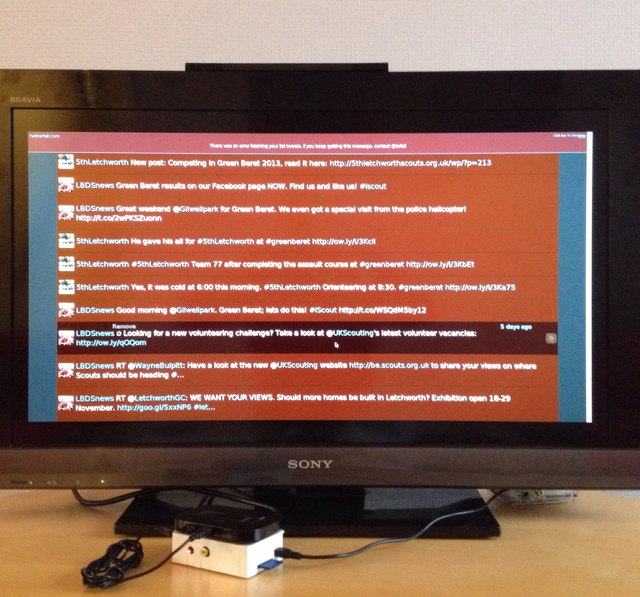
hashtag #5thLetchworth

Background

Every two years, Letchworth and Baldock District Scouts holds its Arts and Crafts competition. This year, it was decided to hold it in a pop-up shop in Letchworth town centre. The theme was Adventure.

The Scouts in my troop, 5th Letchworth, decided it would be a good idea to have a multi-media display; comprising a physical hashtag and a display of tweets containing that hashtag. The hashtag was, of course, #5thLetchworth.

The Scouts constructed the physical hashtag and decorated it with pictures, poems and other items that conveyed the notion of adventure. It was my task to create the twitter display.

System design

The obvious base for the display was a Raspberry Pi! of which I have several. This would be connected to a large screen TV via the built in HDMI interface, and to the Internet via my own Mi-Fi.

The Pi already has XWindows installed, so that would be used to run the Chromium browser. Chromium would be set to display a feed from www.twitterfall.com.

Setting up

Configuring the Pi

As the basis of the system, I chose to stick to the stock Raspbian distribution as it has almost everything I needed. The only changes I needed to make were to set it to startup in headless mode and allow remote VNC connections (because there wouldn’t be a keyboard or mouse connected when the system was in use). I also had to set it to auto-start Chromium.

Setting the Pi to startup in headless mode

To do this, you need to install the x11vnc package.

  1. Logon as the default user pi
  2. Open a terminal session and download the x11vnc package:

    sudo apt-get update
    sudo apt-get install x11vnc

  3. Set a password for when you attach via your VNC client.
    x11vnc -storepasswd

  4. Create a startup configuration for x11vnc. From your home directory:

    cd .config
    mkdir autostart
    cd autostart

  5. Now use your favourite editor to create the file x11vnc.desktop with the following contents:

    [Desktop Entry]
    Type=Application
    Name=X11VNC
    Exec=x11vnc -forever -shared -usepw -display :0 -ultrafilexfer
    StartupNotify=false
    Terminal=False
    Hidden=False

  6. Now reboot the Pi
  7. After it has rebooted, you should be able to use your favourite VNC client to connect to the IP address of the Pi on port 5900 using the password set it step 3.

Installing and autostarting Chromium

  1. Open another terminal session and install chromium.
    sudo install chromium
    cd .config/autostart
  2. Create the file chromium.desktop with the following contents:
    [Desktop Entry]
    Type=Application
    Name=chromium
    Exec=chromium
    StartupNotify=false
    Terminal=False
    Hidden=False
  3. If you now reboot again, the chromium browser should open automatically

Setting Chromium to open www.twitterfall.com automatically

For this to work, you need to authenticate to a twitter account and decide in advance what you wish to display. In my case I wanted to display the output from a specific Twitter List.

Complete the following in the chromium browser:

  1. Open the URL www.twitterfall.com
  2. Authenticate to the Twitter account.
  3. Set Twitterfall to display the appropriate content
  4. Copy the full URL from the chromium address bar; including the /?oauth suffix
  5. Now open a terminal session and edit the file ~/.config/autostart/chromium.desktop and change the Exec= line to be
    Exec=chromium twitterfall.com/?oauth_token=whatever
  6. Save and close and then reboot to test.

Starting Chromium in kiosk mode

The last step is to set Chromium to start in Full Screen mode

  1. Edit ~/.config/autostart/chromium.desktop again and change the Exec= line again to be:
    Exec=chromium -kiosk twitterfall.com/?oauth_token=whatever
  2. Reboot again and it should all work.

One last thing

You will have noticed that Twitterfall cannot be configured to launch in Presentation Mode. This is why you need the remote VNC connection.

I was going to have my MacBook Air with me when I installed this so I simply connected remotely and clicked on the Presentation Mode button in Twitterfall. If anybody knows how to avoid needing to do this, I’d love to hear from them.

The finished article

Display of tweets from #5thLetchworth

Connecting to the Mi-Fi

The topic of How To connect a Raspberry Pi to a 3G network is covered elsewhere.

Thumbs up for Microsoft Support

Microsoft Support persists to get through and close the call

Office 365 Logo

As readers of my Business Continuity UK blog will know, I place a premium on the quality of service I receive from those who supply me with products and services in my business life. My business depends on me having reliable access to high quality products backed up by outstanding service. I hope all companies do the same.

That’s why I use Apple products for my personal productivity tools: laptop, tablet and phone. It was also one of the factors that persuaded me to move from using Google Apps for Business to Microsoft Office 365. Google, in my opinion, is becoming too insular in its device support. Unless you are running an Android powered device, you are rapidly becoming a second class denizen of GoogleWorld.

Admittedly, Microsoft used to be the same as far as Mac support was concerned, but no longer.

Anyway, I’m very happy with the functionality I get from Office 365, and I’m also in the process of moving my personal email account to Outlook.com. A recent experience with Microsoft Support has confirmed the wisdom of my choice.

Whilst support for the Mac is pretty good on Office 365, I did have a reason to raise a Support Ticket via their online portal. It was a minor matter relating to billing, but I found that I couldn’t complete the Service Request. For some reason, each time I selected an option in the drop down menus, the screen refreshed and I had to start again. After trying a couple of times, I gave up and called them instead. Note: I called them: you can’t do that with Google as far as I know; at least not at my subscription level.

Now the first point is that I received outstanding service when I called in with my billing concern. However, whilst I was on the call, I mentioned that I had experienced a problem completing an online service request. The attendant offered to report it for me, so I said yes.

Very soon after, I was contacted by email with details of the new request, asking for more details.
The next day, I received a missed call on my phone and another email to apologise for not getting through but proposing another time to call me.

Mainly down to inefficiency on my part, I missed several attempts to call me. The point is that Microsoft Support didn’t give up. Each time I missed the call, I received another email with a proposed new time. Eventually, we did speak and progressed the issue.

It’s this dedication to getting the problem resolved and closing the call that impressed me. Other organisations would have given up after the first or second failed call, but not Microsoft. That matters to me and it reinforces my decision to move to Office 365.

Oh, and if you’re reading this, Mark, thank you for your perseverance.